Le Van Cuong
Fullstack Developer
Triển khai Jira Software & Jira Services Desk trên server
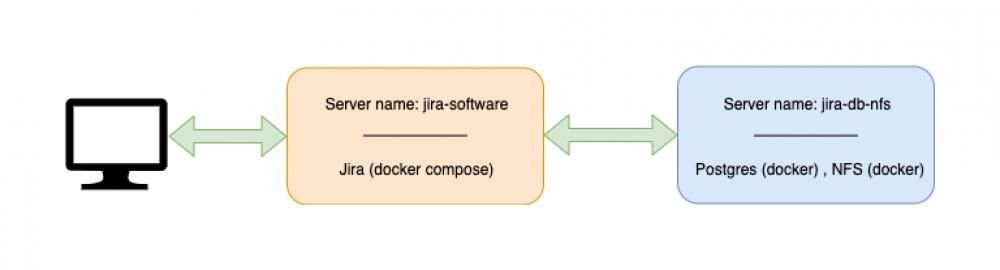
1. Mô hình triển khai

2. Thông tin sizing
| Chức năng | Tên Server | OS | Cấu hình |
Port | Ghi chú | ||
|---|---|---|---|---|---|---|---|
| Ram | CPU | Disk | |||||
| App Jira | jira-software | Ubuntu 20.04 | 4GB | 2 Core | 50GB | 8080 |
|
| Database and NFS server | jira-db-nfs | Ubuntu 20.04 | 8GB | 4GB | 100GB | 5432, 2049 |
|
3. Triển khai db & NFS
Step 1: Cài đặt docker & docker compose
Step 2: Tạo file tên docker-compose.yml
4. Triển khai Jira Software & Jira Services Desk
Step 1: Cài đặt docker & docker compose
Step 2: Tạo file tên docker-compose.yml
Step 3: Chạy docker-compose tại đường dẫn file docker-compose.yml
Step 4: Vào trình duyệt đường link: <ip server jira>:8080
* Chọn phương thức thiết lập
- Chọn I'll set it up myself.
* Kết nối với DB (Nếu có)
- Chọn My own database.
- Khai báo các cấu hình để kết nối với db PostGress
- Test Connection để kiểm tra kết nối, nếu test thành cồng thì bắt đầu tiến hành kết nối với db
* Tạo license trial
- Gia hạn Jira
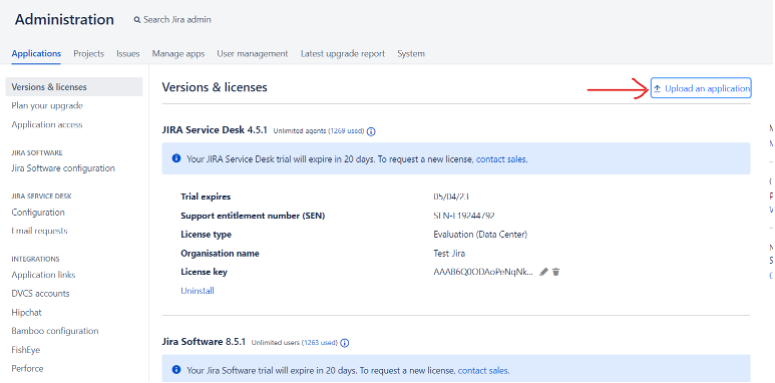
Step 1: Vào mục System -> Application -> Kiểm tra license
Step 2: Ấn vào đường link: my.atlassian.com (Hoặc link Manage licenses trên trang hiện tại) -> Đăng nhập tài khoản Atlassian -> New Trial License
Step 3: Làm theo hướng dẫn, lấy thông tin ID Server tại System Information trong mục System -> System Info
Step 4: Copy license vừa sinh ra update trong mục License Key -> Update
Step 5: Kiểm tra thông tin license đã update chưa -> Hoàn thành
- Gia hạn application trong Jira
Step 1: Vào Manage App -> Manage Apps
Step 2: Chọn App cần gia hạn -> kiểm tra thời điểm hết hạn license
Step 3: Ấn vào đường link: https://marketplace.atlassian.com/ -> tìm kiếm tên App -> chọn App muốn gia hạn -> Try it Free -> Chọn option dành cho Server -> tích chọn I have read and agree to the Terms of Use for the Atlassian Marketplace -> Generate Licensen
Step 4: Copy license vừa sinh ra update trong mục License Key -> Update
Step 5: Kiểm tra thông tin license đã update chưa -> Hoàn thành
* Tạo tài khoản admin
- Nhập thông tin chi tiết cho tài khoản quản trị viên. Có thể thêm nhiều quản trị viên hơn sau khi thiết lập xong
* Thiết lập email thông báo
- Nhập thông tin chi tiết về Mail Server . Điều này sẽ cho phép Jira gửi thông báo qua Mail khi vấn đề thay đổi.
* Tích hợp Jira Service Desk
- Download Jira Service Desk tích hợp vào Jira Software ( jira-servicedesk-application-4.5.1.obr ) tại Link
- Trên giao diện vào JIRA ADMINISTRATION > Applications > Versions & licenses chọn Upload application, upload file jira-servicedesk-application-4.5.1.obr và tiến hành cập nhật license theo bước 3.b